
You’re right to wonder how to get café‑quality foam without a frother. Heat whole milk to about 150 °F (65 °C) – that’s the sweet spot where proteins stay intact and you get glossy micro‑foam. Then pour the milk into a mason jar, fill it a third full, seal, and shake vigorously for 30 seconds; let it rest a minute, tap the jar to pop big bubbles, and finish with a short microwave burst to lock the texture. This simple method gives you a silky, stable foam ready for any drink.
What Is Milk Frothing and Why Temperature Matters
What is milk frothing and why does temperature matter? You’re probably wondering why a simple heat change can ruin a latte, and you asked the right question. Frothing injects air into milk, turning it into a glossy, velvety micro foam. The temperature impact is huge: heating to about 150‑155 °F (65‑68 °C) creates a creamy texture, while pushing past 170 °F (77 °C) scorches the protein and collapses the foam.
Now, think of milk like a stretchy rubber band. When you introduce air near the surface, the band expands, then you swirl to smooth the bubbles into micro foam. If you overheat, the band loses elasticity, and the foam turns dry and airy.
Here’s the thing: the sweet spot balances volume and fine bubbles, giving you a silky mouthfeel without burnt flavor. The takeaway? Keep your milk in the 150‑155 °F window, and you’ll consistently achieve perfect micro foam. Ready to learn which milk works best for this temperature range? Using a hand‑held frother at a moderate speed helps create uniform micro‑foam. Different frother designs, such as automatic countertop machines, can also maintain optimal temperature while aerating the milk. A French press can generate similar foam when you pump the plunger rapidly after heating the milk.
Pick the Best Milk and Heat It Just Right for Milk Frothing
You’re probably wondering which milk will give you that silky foam without turning into a watery mess, and you asked the right question.
Which dairy works best for frothing?
Whole milk tops the list because its fat‑protein balance creates dense, creamy microfoam. Heat it to about 65 °C (150 °F) and you’ll have extra time to stretch the foam before it overheats. Fresh milk works better than milk that’s sat open for days, and a cold pitcher slows early warming, giving you more control.
What about low‑fat or plant‑based options?
Skim or 2 % milk yields larger bubbles and more volume, but the foam is lighter and less stable. Soy milk, especially barista‑style, froths well at a cooler 55 °C (131 °F) to avoid curdling. Oat and almond milks also need lower temps—around 60 °C (140 °F) for oat and 55 °C for almond—to stay smooth.
Takeaway: Choose milk based on the foam texture you want, then apply temperature precision within the recommended range. Next, you’ll learn how to create that foam without a frother.
A key factor is micro‑foam consistency which determines how well the milk integrates with espresso.
regular descaling can prevent mineral buildup that would otherwise affect heating consistency.
Choosing a bar‑strength almond milk can significantly improve foam stability and texture.

FROTH + STEAM PERFECT LATTES: With Oat Barista Blend you can froth and steam perfect dairy-free lattes at home. Naturally creamy and subtly sweet, Oat Barista Blend is made for lattes.

Califia Organic Oat Barista Blend Milk, Dairy Free, No Sugar Added, 32 Fluid Ounces (Pack Of 6)

YOUR FAVORITE AT HOME: Pumpkin Spice Oat Barista Blend is a one-stop-shop to make your favorite festive coffee at home. Steam or froth it and add it to espresso for the perfect Pumpkin Spice Latte that's dairy-free, plant-based, and oh so delicious. And since it comes in pantry-safe packaging, you can stock up and never run out!
Shake It Up: Jar‑Shaking Method for Milk Frothing
If you’re wondering why a simple jar can give you café‑style foam, you’re asking the right question.
How much milk should you put in?
Use a clean, heat‑safe mason jar, 500–600 mL or 16 oz, and fill it only one‑third to one‑half full. That headspace lets air swirl in, shaping a good foam design.
What’s the shaking secret?
Seal the lid tight—no leaks, no splashes. Shake vertically, up and down, for about 30 seconds. The rapid motion forces tiny bubbles into the milk, creating a stable froth.
Do you need to let it rest?
After shaking, set the jar down for 30 seconds to a minute. Larger bubbles rise and pop, refining the foam. You can tap the jar lightly to pop any remaining big bubbles before pouring.
Should you heat it?
Microwave the exposed jar for 15‑30 seconds. Gentle heat expands the bubbles, locking the foam design in place without overflowing.
Takeaway: A tight lid seal, proper fill level, and a 30‑second vigorous shake give you café‑style foam. Next, try a quick microwave burst to lock in the texture.
Adding a small amount of high‑protein oat milk can further improve foam stability.
Consistent pour ensures even extraction, mirroring the controlled flow used in Chemex brewing.Paper towel filters can be porous enough to allow liquid through, but they may contain chemicals that affect flavor.

High-Grade Glass: Made with premium BPA-free and lead-free food-grade glass, ensures long-lasting durability and offers a clear view of contents, preserving the freshness and integrity of stored food.

One-Piece Airtight Lids: The reusable one-piece design features a built-in inner seal that helps prevent leaks, keep contents fresh, and simplify cleaning.

✔️ Airtight & Leak-Proof Seal – Secure lids maintain food freshness and stop spills. Regular mouth design facilitates filling and cleaning for simple storage and meal preparation.
Whisk or Hand‑Mix: Manual Milk Frothing Without Gadgets
A tight‑lid jar gave you quick foam, but you can get even more control with a simple whisk. You’re probably wondering why a whisk feels old‑school; actually, the whisk technique lets you inject air faster than a spoon and keeps foam stability high.
How do you start?
First, pour cold, fresh milk into a wide‑mouth jar or mug, leaving space for expansion. Heat it to about 140 °F—no boiling. Then, hold the whisk between your palms and spin it briskly, moving in a back‑and‑forth motion for 1‑2 minutes.
What should the foam look like?
You’ll see the volume roughly double and the surface turn glossy. Tap the jar gently to pop large bubbles, then swirl a few seconds to smooth the texture.
Takeaway
A proper whisk technique yields creamy, stable foam without gadgets. Next, you might try a hand‑held frother or immersion blender for even quicker results. (Use a stovetop for temperature monitoring) Regular descaling helps maintain optimal performance. Regular descaling prevents mineral buildup that could otherwise affect heating consistency. Adding a splash of nitrogen‑charged water can enhance the foam’s silkiness.

POWERFUL FROTHING EXPERIENCE: Skip the coffee shop run and enjoy lattes, cappuccinos, matcha, hot chocolate, powdered drinks, or iced coffee at home with this milk frother. With a 13,000 RPM motor and 26 spiral rings, this coffee foam maker turns ordinary milk to frothy perfection in seconds. The cup blender wand makes your frothing experience unlike any other.

★FOOD GRADE STAINLESS STEEL – The rotating whisk is made of food grade stainless steel, so it’s antirust and durable, The semi automatic whisk has a long service life, which can save your time and effort.

【Food Grade Stainless Steel Egg Whisks】: The hand push whisk is made of food grade stainless steel, so it’s antirust and durable, the semi automatic whisk has a long service life, which can save your time and effort.
Blend or Immersion‑Blend: Quick Milk Frothing With Common Tools
Immersion blender
Use a tall, narrow cup so the blade stays fully submerged. Heat milk to about 150 °F, then fill only halfway. Submerge the head, turn on high, and move the wand up‑and‑down. Short bursts give light froth; a longer blend yields denser foam. Stop when the milk looks glossy, not overly bubbly.
Stand blender
Warm the milk first, then pour it into the blender, leaving space for expansion. Cover the lid with a towel to catch splatter. Pulse briefly until bubbles appear, then blend a few more seconds for a quick foam. Whole milk makes richer foam; non‑fat gives higher volume.
Takeaway: Both tools produce froth fast—just keep the container narrow, avoid overfilling, and stop at a glossy texture. Next, you might try a French press for an even smoother latte‑like foam. Use a metal container for the milk. Cleaning the French press after each use helps preserve flavor and extend the device’s lifespan. For optimal foam texture, aim for a temperature of 140–150 °F to avoid scalding.
Choosing the right espresso system can also influence how often you’ll need to froth milk, as pod machines often come with built‑in steam wands.

1000W Motor & 304 Stainless Steel 4-tip Blade: Compared with other 300-500W motors, upgraded KOIOS handheld blender is equipped with a 1000W all-copper motor, which is more powerful and has a stronger ability to crush food. With 304 food-grade stainless steel blades, this material has good oxidation resistance and high temperature resistance. Safe to use even in hot soup.

Powerful DC Motor for Daily Blending-400W rated DC motor (800W peak power). Supports chopping nuts, mashing potatoes and processing hard ingredients. Note: max 60s continuous operation per cycle.

No More Lumpy Chunks: Equipped with a strength 1100W full copper motor, providing for several times significantly stronger blending and chopping capabilities in seconds to create velvety smooth puree results
Use a French Press or Pump Frother for Bar‑Style Milk Frothing
You’re probably wondering why a French press or a pump frother can give you that bar‑style microfoam without a pricey machine. Here’s the thing: you heat whole milk to about 140‑150 °F, then pour it into a press that’s only a third full. Rapid, vigorous plunges for the surface for about a minute, and the volume roughly doubles, yielding silky foam.
All right, a Pump‑frother works the same way but with a hand‑operated plunger that forces air through the warm milk. You pump repeatedly, watching the foam thicken, but stop before large bubbles appear. Whole milk gives the richest texture; non‑dairy may need extra time.
Obviously, the key is warm milk, controlled agitation, and not over‑pumping. The takeaway: a French press or Pump‑frother can deliver bar‑style foam in minutes, using just milk, heat, and a little arm work. Ready to try the next step—pouring and stabilizing the foam? The fine grind used in espresso‑style coffee helps create a richer, more stable foam when combined with micro‑foam pressure techniques. Proper priming ensures consistent extraction pressure.

Milk frother manual milk frother creates an airy foam in less that 30 seconds for a Cafe style Coffee you will love from the Comfort of your own home
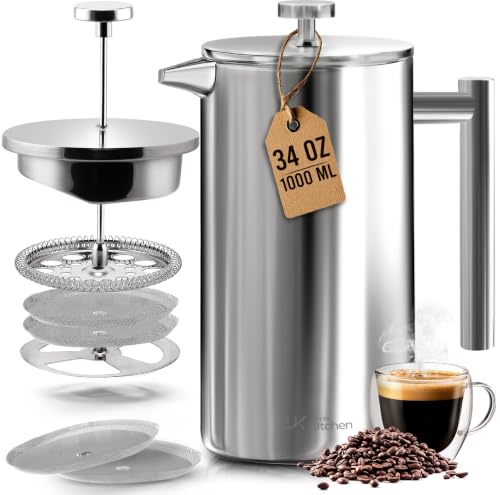
Double-Walled French Press: Make perfectly brewed coffee at home like a barista. The double-walled coffee press is heat resistant. Its solid construction will keep the drink hot for a long time.

Superior Filtration: A solid filtration system in a coffee maker ensures a refined taste and robust flavor mouthfeel. Our 4-filter sieve system has an improved piston plate and 80 mesh filter that extracts the earthy, rich taste of residue-free coffee. This 1000 ml/34 Oz beaker makes 4 cups of creamier & tastier coffee.
Finishing Touches: Pour, Tap, and Stabilize Milk Frothing Foam
If you’re wondering why your foam collapses before you even start pouring, it’s because the milk’s micro‑bubbles need a gentle “settle‑in” before they’re transferred.
How do I keep foam texture while pouring?
Tilt the cup, aim the stream at the center, and pour slowly. The gentle flow keeps microfoam and liquid milk integrated, preserving foam texture and surface sheen. Hold back a spoonful of foam if you want a clean milk base for latte layering later.
Why tap before I pour?
A light tap on a flat surface collapses large surface bubbles that make foam look coarse. Repeat soft taps, not hard strikes, to avoid breaking the micro‑bubble structure.
When should I swirl?
Give the pitcher a whirlpool motion right after tapping, and again if the milk sits a few seconds. Swirling recombines foam and milk, yielding a glossy, paint‑like surface sheen perfect for foam art.
Takeaway: Tap, swirl, then pour promptly to lock in foam texture, surface sheen, and latte layering. Ready to create that perfect latte art? Ensure the jug is flat and level before steaming to maintain a consistent vortex.
A well‑steamed milk creates a velvety micro‑foam that enhances the coffee’s flavor profile, while light frothing yields a brighter, airy foam ideal for visual appeal. The high‑pressure extraction of espresso produces a concentrated crema that differs markedly from the French press’s full‑bodied, slightly gritty cup.
Regularly descale the machine to prevent mineral buildup, which can affect water temperature and ultimately the quality of both espresso and steamed milk.