
Pick the right Imusa model for your space, then fill the reservoir with cold filtered water up to the marked line. Grind beans fine, about 10 g per shot, and loosen them into the filter funnel without tamping. Click the boiler onto the base, lock the funnel, and screw the top pitcher firmly. Heat on medium flame or electric setting, watching the steady stream; turn the dial off when it stops. Let it cool, vent steam, and rinse all parts. Follow the next steps for deeper maintenance tips.
Pick the Imusa Model That Works Best for Your Kitchen
Which IMUSA model fits your kitchen best? If your kitchen size is limited, the 4‑cup electric espresso/cappuccino maker is your go‑to. Its compact, lightweight design slides onto narrow counters or fits into dorm closets, and its simple one‑touch or dial control keeps operation swift. For families or shared break rooms craving higher brew capacity, the 6‑cup model delivers more servings per cycle without crowding the workspace. Both units use a heated base and pressure‑driven brewing, so you won’t need a stovetop flame. Check the capacity label—3‑cup, 4‑cup, or 6‑cup—before buying, because serving expectations differ. Choose the model that matches your space constraints and the number of cups you’ll drink daily. The Imusa Espresso Maker, GAU‑18235, operates at 800 W power. Adding a capsule‑based system can further simplify brewing and ensure consistent flavor. Proper brew ratio helps achieve a balanced, smooth cup every time. Mastering grind consistency is essential for extracting the full flavor profile from your beans.

VERSATILE CAPACITY: Brew 6 or 3 espresso cups (1.5 oz each), letting you adjust the serving size to suit your preference and occasion

SEMI-TRANSPARENT WATER RESERVOIR holds up to 5 cups of water capacity with a level indicator to always ensure you have enough water ready for brewing.

Note: 1)Too coarse a grind, too little coffee, or insufficiently tamping the grounds before brewing can all lead to inadequate pressure for a proper brew. 2)It is important to note that the amount of espresso extracted will vary depending on the grind size and amount and reprogramming may be needed when the size and amount are adjusted
Gather Fresh Water and the Proper Coffee Grind for Your Imusa Espresso Maker
Now that you’ve chosen the right IMUSA size, start by filling the reservoir with cold, fresh water up to the marked line for your model—4‑cup, 6‑cup, or the safety‑valve level on moka‑style units. Use water filtration if possible; filtered water minimizes mineral buildup and keeps pressure consistent. Next, grind your beans to a fine espresso grind texture, finer than drip coffee but not so fine that it clogs the funnel. Aim for about 10 g (≈2 tsp) per shot, leveling the grounds evenly in the basket without tamping. A medium‑dark roast works well when ground finely, delivering rich flavor and proper extraction. Verify the water level and grind texture before you engage the boiler, ensuring optimal pressure and flow. The safety pin indicates the maximum water level; water must not exceed this mark. Paper towels can be used as a temporary emergency coffee filter, though they may affect flavor and safety. Consistent particle size from a burr grinder helps achieve the ideal extraction for espresso. Proper grind consistency ensures even water flow and prevents channeling.
Assemble the Boiler, Funnel, and Coffee Basket Correctly
How do you guarantee the Imusa espresso maker brews safely and efficiently? First, place the boiler on the electrical base, ensuring the connection clicks fully; this guarantees base safety and prevents power loss. Hold the boiler steady, insert the funnel straight into the water chamber, and lock it before tightening the unit. Align the 3‑cup adapter if needed, then add coffee without compressing the grounds. Next, screw the top pitcher onto the boiler clockwise, using one hand to hold the boiler and the other to turn the pitcher. Tighten until you feel firm resistance; a loose top leaks steam and coffee. Keep the switch OFF, close the lid, and only plug in after the entire assembly is complete. This sequence maximizes assembly speed while maintaining safety. Regular descaling removes mineral buildup that can cause clogged water lines and affect performance. Clean the steam wand after each use to prevent milk residue buildup. The high‑pressure extraction of espresso creates a rich crema that distinguishes it from other brewing methods.
Fill the Bottom Chamber to the Safety Valve and Measure Coffee Dose
Because the safety valve marks the maximum safe water volume, fill the bottom chamber with cold water until the liquid reaches just below the valve line, then level the finely ground coffee in the funnel up to the rim without tamping, wiping away any excess grounds before sealing the top chamber. This valve safety step guarantees proper steam space and prevents over‑pressure. Aim for roughly 345 g of water in a three‑cup Imusa, aligning the surface with the valve. For coffee dosage, use 20–22 g of fine grounds, filling the basket completely but loosely. Gently tap the funnel to settle the bed, then scrape the rim clean. Verify the valve remains visible and unobstructed before you assemble the top chamber. Improper water level can cause slow steam buildup and over‑extraction. Grinding beans near the brewing equipment helps preserve aroma and freshness. Using a consistent grind size ensures even extraction and optimal flavor.

VERSATILE CAPACITY: Brew 3 or 6 espresso cups (1.5 oz each), letting you adjust the serving size to suit your needs

VERSATILE CAPACITY: This espresso maker offers the flexibility to brew either 6 or 3 espresso cups, with each cup holding 1.5 oz, allowing you to adjust the serving size according to your preference and the occasion

The original moka coffee pot: Moka Express is the original stovetop espresso maker, it provides the experience of the real Italian way of preparing a tasteful coffee, its unique shape and the inimitable gentleman with moustache date back to 1933, when Alfonso Bialetti invented it.Filter type:Reusable
Load Coffee Grounds Loosely & Seal the Chamber
When you pour the finely ground espresso into the filter funnel, fill it lightly and spread the coffee evenly without tamping; a loose, level bed prevents channeling and guarantees consistent extraction. Aim for a fine‑medium texture that flows easily under pressure; too coarse weakens flavor, too fine raises resistance if packed. Tap the basket gently to level the grounds, then close the top chamber. Screw the portafilter or lid until you feel firm resistance—this maintains seal integrity and prevents steam leakage. Avoid overfilling; excess grounds can spill into the gasket, compromising the seal. A correctly loaded, loosely packed puck paired with a tight, secure closure delivers consistent pressure, peak flavor, and reliable shots every time. Unplug the unit before cleaning to ensure safety. Consistent grind size is crucial because uniform particle distribution helps maintain even water flow and prevents channeling. Using beans that are not roasted for espresso can lead to under‑extracted shots due to low solubility. Espresso grind fineness is essential for achieving proper extraction pressure.
Heat the Stovetop or Power the Electric Base for Optimal Extraction
If you set the stove to a steady medium flame (or a medium‑high setting on an electric coil), the water will heat evenly and the pressure will build gradually, delivering a smooth, balanced extraction. Keep the pot’s base in full contact with the burner; match burner size to the pot for uniform flame control. On gas, a low‑to‑medium flame prevents scorching the handle while maintaining steady percolation. For electric tops, start at power settings around 5–6, then dial back once coffee rises to avoid harsh over‑extraction. Preheat the bottom chamber with hot water to shorten brew time and limit “cooking” of grounds. Maintain a gentle, continuous gurgle; avoid rapid boiling or sputtering, and remove the maker the soon as the first strong gurgle sounds. This disciplined heat management yields a clean, balanced espresso. Proper assembly is essential before brewing to ensure a tight seal and prevent leaks. The machine’s 19‑bar pressure system then forces the hot water through the coffee grounds, creating a rich crema. Using a hand‑held whisk can help break up any clumps of foam that form, resulting in a smoother texture. Vertuo’s centrifuge extraction allows for larger cup sizes while preserving flavor intensity.

CRAFT COFFEE AT HOME: Produces six demitasse/espresso servings of rich, smooth espresso coffee in minutes. Craft your own espresso, Americano, Cuban coffee, Italian-style coffee, Moka, lattes, cappuccinos and more from the convenience of your home.Filter type:Reusable

MEDIUM CAPACITY: This stovetop espresso maker brews six cups of rich, full-bodied coffee using traditional Italian moka pot brewing method, forcing hot water through grounds for barista-quality espresso flavor in minutes

Electric Moka Pot Espresso Maker, No Stovetop Needed — Brew rich, full-bodied espresso in minutes with a modern electric design—no stove required.
Monitor the Brew: When to Turn Off Your Imusa Espresso Maker
What should you watch for to know when the Imusa espresso maker has finished brewing? Keep an eye on the first flow into the carafe; it appears after 2‑5 minutes and signals the extraction phase has begun. Observe the steady pour and listen for sound cues. As the espresso stream wanes, the brewing noise diminishes. When the flow stops completely and no coffee enters the carafe, the cycle is ending. At that moment, turn the dial to Off. Do not remove the filter holder or open the reservoir while the flow continues. Waiting for the natural halt prevents steam exposure, preserves yield, and guarantees a consistent batch before you proceed to serving. Regularly descaling with a citric‑acid solution helps maintain optimal temperature stability. Proper descaling prevents mineral buildup and extends the machine’s lifespan. The single‑serve convenience of pod systems contrasts with the manual control offered by traditional espresso makers.
Cool Down Safely and Disassemble Without Scalding
Because the boiler and surrounding metal stay hot well after brewing, you should let the Imusa espresso maker cool for at least fifteen minutes before opening any parts. After the wait, turn the dial to the Steam setting and hold a cup under the wand to execute a pressure release; this venting step eliminates residual pressure safety hazards. Use oven‑mitt caution when you twist the tank cap slowly, allowing any remaining steam to escape gradually. When the cap loosens, set it aside and avoid sudden metal handling that could fling hot vapor. Inspect the boiler and surrounding metal with a gloved hand—these surfaces retain heat and can scald if touched directly. Only after the steam has fully subsided should you proceed to disassemble, ensuring each movement is controlled and safe.
Clean, Dry, and Store Your Imusa Espresso Maker for Consistent Performance
When you finish brewing, immediately remove any remaining water, rinse all removable parts, and dry them thoroughly before reassembly; this routine eliminates moisture that can cause mold, corrosion, or performance loss, ensuring your Imusa espresso maker stays consistent and ready for the next use. Empty the reservoir by turning the unit upside down, then wipe the interior dry. Hand‑wash the filter basket, holder, drip tray, and carafe with warm, soapy water; avoid dishwashers. Clean gaskets and hidden crevices regularly to prevent buildup. Descale with a vinegar cycle when mineral deposits appear, followed by two cold‑water rinses. Allow all components to air‑dry completely, then coil the cord under the base. Store the machine in a dry, well‑ventilated location; proper storage and maintenance preserve performance and extend the life of your Imusa espresso maker. Use a Brillo pad with a little soap for stubborn oil and coffee residue.

🧹【Package Included】The package contains 1 pcs dusting coffee grinder brush,the size is about 13cm × 1cm,can meet your daily use.
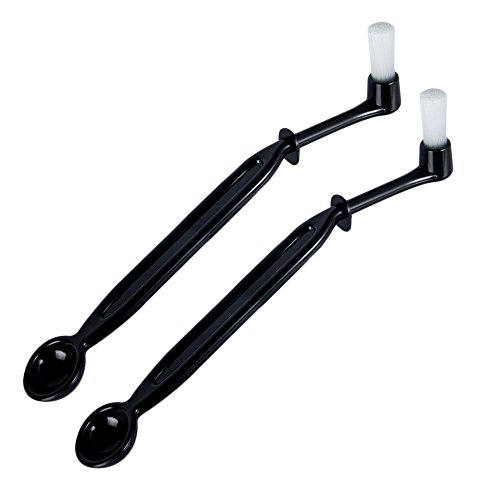
Perfect cleaner and clean your group head on your espresso machine

【ESPRESSO BRUSH】- 2pcs espresso machine cleaning brush with spoon and 2pcs detachable brush head.