
Plug the Vertuo Next into a working outlet, fill the water tank, and lock the head until the light steadies white. Open the head, place a capsule dome‑down, align the barcode, and press it in until it clicks, then close the head and lock the lever. Position a cup on the support, press the central button, and wait for the steady white light signaling brew completion. You can pause, top‑up, or eject the capsule using the button and lever. After brewing, rinse the tank and run a cleaning cycle; the next steps cover descaling and maintenance.
Plug in Your Nespresso Vertuo, Fill the Tank, and Lock the Head
Where do you start? Plug the power cord into a functioning outlet, then press the button or close the lever to power on the Vertuo Next. Observe the blinking light; after roughly 30 seconds it steadies white, confirming the machine is ready. Next, rinse the water tank and lid, then fill the tank with fresh drinking water, respecting the tank capacity limit. Reattach the lid securely and position the tank in its slot, ensuring it clicks into place. Verify the capsule container and cup support are installed, then close the machine head fully and move the lever into the lock position. This lock also activates the machine. Double‑check that the light remains steady white before proceeding to any rinse or brew cycle. Perform a freshwater rinse before the first brew to clean the needle area. Proper machine priming ensures optimal pressure for consistent extraction. Regular descaling helps maintain temperature stability and prolongs the machine’s lifespan. Regular descaling removes mineral buildup that can impair pressure and shorten the machine’s life.

Water Tank & Lid Combo: includes both the water tank and the lid cover, providing a complete and cost effective replacement solution; The lid helps prevent dust and debris from entering the tank while keeping the water fresh, ensuring your coffee machine continues to function efficiently while maintaining its sleek and modern appearance

Pacakge Contents - Includes coffee machine water tank with lid, check the items after receiving. Cost-effective solution to extend your machine’s life.
Insert a Vertuo Capsule Correctly and Close the Machine Head
Now that the tank is filled and the head is locked, release the head by pulling the lever to the open position. Verify the head opens fully; a smooth lever motion prevents misalignment. Choose a Vertuo capsule—its dome‑shaped body and silver foil lid are distinct from OriginalLine. Hold the capsule so the dome faces downward and the foil lid faces upward. Align it centrally in the brew chamber; the flat base should sit flush. Press the capsule gently until it seats evenly, ensuring the barcode aligns with the sensor. Close the head by pushing it down until you hear a click, then rotate or engage the lock symbol for head locking. Confirm the lock is secure before proceeding to brew. The water tank is positioned on the left side of the machine. The machine’s high‑pressure pump creates up to 19‑bar pressure to extract the coffee quickly. A regular descaling routine helps maintain optimal brew temperature and prolongs machine lifespan. Proper sealing of the capsule prevents air leakage and ensures consistent extraction.
Start Brewing a Vertuo Cup: Place a Cup, Press the Button, and Wait for the Steady Light
Before you press the button, make sure a properly sized cup is positioned on the adjustable support; set the support to the top, middle, or bottom slot depending on whether you’re making espresso, a mug‑sized coffee, or a taller travel cup. Choose a cup design that can hold the full brew volume to avoid overflow. Press the central button once; the machine reads the capsule barcode and begins a brief pre‑wetting phase. Watch the light cues: a blinking white light means the unit is heating, which takes about 30 seconds. When the light steadies, the machine is ready and the brewing cycle starts automatically. Monitor the steady light until it returns to idle, indicating the cup is filled and the process is complete. Ensure the cup is stable before brewing cup stability. Rinsing the water reservoir helps maintain optimal coffee quality. Regular descaling helps maintain coffee flavor and prolongs machine longevity. Refer to the manufacturer’s guide for proper error code troubleshooting.

【Fits MS-624960】 Perfect replacement for Nespresso Vertuo Next. Exact fit for part #MS-624960.
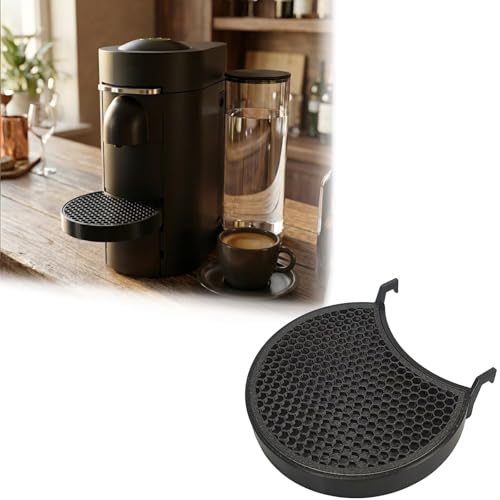
Perfect Fit Replacement :This drip tray is designed for Nespresso Vertuo Plus and for Vertuo Plus Deluxe models. It securely fits into the existing slot on the coffee machine, providing a stable and reliable support platform for your coffee cup
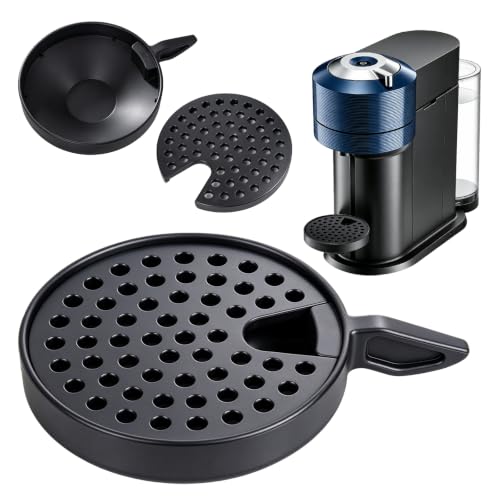
Compatibility: Designed to be compatible with the nespresso vertuo next coffee machine. This replacement drip tray aligns with the machine's base to maintain its intended appearance. Designed for convenient removal and installation. The tray can be rinsed under water, which helps simplify daily maintenance and upkeep. It provides a practical alternative to help extend the use of your vertuo next machine.
Control the Brew: Pause, Top‑Up, and Eject the Capsule When Finished
Need you need to pause, top‑up, or eject a capsule, the Nespresso Vertuo Next makes it straightforward—just use the coffee button and follow the safety cues.
For pause safety, press the coffee button once. The brew stops early, the light turns steady white, and you must wait until the machine fully ceases before opening the head. Never lift the head while coffee is still flowing.
To top‑up, repeat the pause sequence, let the head release, then press the button again to restart brewing. Insert a fresh capsule only if needed.
For capsule ejection, open the head after the button steadies, turn the lever right to the release position, and the used capsule drops into the internal container. Close the head only after the capsule has been released.
Coffee button light blinks while heating for approximately 30 seconds before becoming steady. The gasket seal ensures pressure is maintained during brewing.
A consistent coffee‑to‑water ratio helps achieve balanced flavor across all brews.
Regular descaling is essential to prevent mineral buildup that can affect brew performance.

Large Capacity: Stores up to 40 large or 60 small Vertuo capsules, easily fitting most standard 3-box sleeve sets with extra space. Keep flavors organized and reduce refill frequency at home or in the office

HOLDS 40 CAPSULES: Four rows of ten store capsules for Nespresso Vertuo, and every Vertuo capsule size fits the rails. Capsules are not included; this is the holder only.

[ Versatile Storage ] It can store up to 24 large or 48 small Nespresso Vertuo coffee capsules, providing flexibility based on your capsule preferences.
Clean the Machine After Brewing and Before Descaling
After each brew, rinse the water tank and lid with fresh drinking water, then securely re‑fit them before you start any cleaning or descaling routine. Empty the tank, rinse it and the lid, and wipe away visible residue to prevent buildup. Remove the capsule container, drip tray, and cup support; wash each with hot water and a mild, odorless detergent, then rinse thoroughly. Perform a cleaning rinse cycle: lock the machine, guarantee no capsule remains, place a 1‑L container under the outlet, and start the rinse program as per the manual. After the cycle, dry the machine with a clean towel and let it sit ten minutes. Conduct a filter inspection, verify residue removal, and confirm the machine is completely dry before moving to descaling. Wear protective gloves while handling cleaning solutions to protect your skin. Regular descaling ensures optimal water hardness control and prolongs machine lifespan. Proper water temperature helps maintain consistent extraction quality.
Prepare the Machine for Descaling: Empty Capsule Container and Place a Large Rinse Container
How do you get the Nespresso Vertuo Next ready for descaling? First, pull out the capsule container and discard every used pod. Empty it completely so no spent capsules remain, then wipe the interior. Next, remove the drip tray, empty any liquid, and clean it before reinstalling. Once the tray is back in place, focus on rinse container placement. Choose a jug or bowl that holds at least 34 oz, position it directly under the coffee spout, and make certain it stays centered. This large container will capture the descaling solution and the subsequent rinse water without overflow. Finally, verify the machine is plugged in, has no capsule inserted, and that both the capsule container and rinse container are correctly set before you start the descaling cycle. Fill the water tank with 17 oz of water and ensure the Machine Head height aligns with the fill level. Regular descaling helps maintain coffee quality and extends the machine’s lifespan. Proper descaling prevents mineral buildup that can impair heating efficiency.
Run the Descaling Cycle: Button‑Hold to Solution Flush
Now that the capsule container and rinse jug are in place, you can start the descaling cycle. Close the head, lock the lever, and power on. Wait for the light to steady, then release the lever while the head stays closed. Press and hold the button for about 7 seconds; the light will go off and start rapid orange blinking, confirming descaling mode. Release the button. The machine will begin the solution flush automatically. It dispenses the descaling mixture in intervals, pausing briefly between bursts—this is normal. The orange blink continues throughout the cycle, which typically lasts around 20 minutes, depending on fill volume. Do not interrupt; let the tank empty and the light change before proceeding. Factory reset may be required if the machine does not enter descaling mode after following these steps. Regular descaling prevents mineral buildup that can impair pressure and shorten the machine’s lifespan.
Finish the Vertuo Routine: Clean‑Water Rinse, Dry, and Get Ready for the Next Cup
If you’ve just finished the descaling flush, start the clean‑water rinse by placing a 1‑liter container under the outlet, refilling the tank with fresh water, and pressing the coffee button three times within two seconds; the machine will pause briefly, then run an automatic rinse that lasts five to seven minutes, during which the light blinks orange until it steadies to white or green. First, verify the tank is clean, the lid is sealed, and no capsule sits inside. After the button sequence, wait up to two minutes for flow to begin. The rinse timing is set by the machine; do not interrupt. Keep the container capacity at least one liter to capture all bursts. When the light steadies, open the head, discard the water, and wipe any drips. Allow the unit to dry for ten minutes, then refill the tank, reassemble the drip tray and cup support, and lock the lever. The Vertuo Next is now ready for the next cup. Ensure the power cord is plugged in before starting the rinse. Regular descaling helps maintain optimal brewing pressure and prevents clogging.