
You’re right to wonder why your espresso tastes off—dirty parts and mineral buildup sabotage pressure and flavor. First, unplug the machine, empty and dry the reservoir, then wipe the exterior with a barely damp cloth. Next, wash the carafe, filter, brew basket, and drip tray in warm, soapy water; soak the carafe in a 1:2 vinegar‑water mix if there’s odor. Now, run a descaling cycle using the same vinegar solution, let it soak 15‑30 minutes, and follow with three fresh‑water rinses. Finally, reassemble, brew a test cup, and you’ll notice a clean, consistent taste—keep a monthly schedule and you’ll avoid leaks and extend the machine’s life.
Unplug Your Mr. Coffee Espresso Machine
Why should you unplug before cleaning? You’re probably wondering if it really matters, and the answer is simple: safety and power off are non‑negotiable. When you turn the unit to OFF and pull the plug, you eliminate any chance of electric shock or accidental activation while you handle hot frothing tubes, the brew basket, or the drip tray.
Now, the machine still holds heat and pressure after a brew, so you let it cool for at least five minutes and release any trapped steam before you touch anything. This step protects you from burns and prevents water from spraying when you open pressurized sections.
All right, remember: keep the cord out of the sink, never immerse the main body, and only reconnect power after you’ve finished washing and rinsing every removable part. Takeaway: unplug, cool, release pressure—then you can clean safely. Ready for the next step? Let’s talk how to empty and dry the water reservoir safely. Basic Power Reset is the first step for most issues. Regular descaling helps prevent mineral buildup that can impair performance. Descaling solution removes accumulated scale and restores optimal brewing temperature. Properly cleaning the group head removes coffee oil residue that can dull flavor.
Empty and Dry the Water Reservoir Safely
How do I safely empty and dry the water reservoir? You’re probably wondering why you must pause for a pressure release before touching anything. Obviously, the machine stays under pressure after brewing, so you first turn it OFF, unplug, and let it cool. Then you press the release valve or wait a minute for pressure handling to settle, preventing any sudden spray when you lift the cap.
Now, remove the reservoir cap or lid carefully after the pressure’s gone. Turn the machine upside‑down over a sink and let the water pour out through the top opening—no immersion, no wetting electronics. Rinse the reservoir a couple of times with fresh tap water, letting each rinse cool before the next cycle.
All right, dry the parts completely. Place the cap, lid, and reservoir on a dish rack or clean towel until no moisture remains. Once everything’s dry, you can reassemble and move on to the next cleaning step. Takeaway: pressure release, careful emptying, thorough rinsing, and full drying keep your espresso machine safe and ready for the next brew. Unplug device before cleaning. Regular descaling with a descaling solution helps maintain optimal taste and prolongs machine life. Descaling every 2–3 months prevents mineral buildup and ensures consistent performance. Regular descaling also protects the pump pressure from clogging.
Wipe the Exterior and Control Panel
If you’re wondering why the exterior and control panel need a special wipe‑down, it’s because moisture and grime can sneak into seams and affect the buttons. You’ll want a soft, damp cloth—just barely moistened, not dripping. Wipe the whole housing, paying extra attention to corners, edges, and any coffee or milk spots. A quick dry pass prevents streaks and protects the finish, giving you that subtle Exterior polish look.
Now, for Panel protection, keep the power off and unplugged. Gently glide the cloth over buttons, dials, and indicator lights, using light pressure around seams. If a stubborn residue appears, dampen the cloth slightly and repeat, then dry the area with a clean towel. Avoid sprays, abrasive pads, and excess water near openings.
Takeaway: A brief, careful wipe keeps the machine looking sharp and its electronics safe, setting you up for the next step—cleaning removable parts. Use a dedicated cleaning container for the milk side to prevent scum buildup. Regularly descaling the boiler helps avoid mineral buildup that can impair heating efficiency. Follow the safety guidelines when opening the machine to prevent damage and ensure proper reassembly. The compact design of Nespresso machines exemplifies how a small footprint can deliver high‑quality espresso with minimal effort.
Wash Removable Parts (Carafe, Filter, Brew Basket, Drip Tray)
You’re probably wondering why you need to clean each removable piece after every brew, and the answer is simple: leftover coffee oils and grounds turn into stale flavor and odor fast.
How do I stop carafe odor?
Wash the carafe in warm, soapy water right after use, then give it a 20‑minute soak in a vinegar‑water mix if it smells sour. Rinse thoroughly, dry with a soft cloth, and you’ll keep each brew tasting fresh.
What’s the best filter cleaning routine?
Remove the filter immediately, rinse permanent ones under running water, and discard paper filters each time. For reusable filters, soak in warm, soapy water, scrub gently, then rinse well—no soap residue left to taint your espresso.
How should I treat the brew basket and drip tray?
Empty the basket, scrub with warm, soapy water, reach every corner with a brush, then rinse and dry fully. Same for the drip tray: wash, rinse, dry, and reassemble only when completely dry.
Takeaway: Clean each part after every brew, rinse well, and dry fully to avoid odors and stale flavors. Next, you’ll want to tackle mineral buildup with a proper descaling solution. Regular descaling removes limescale that can cause clogs and overheating.

【 Best Espresso Cleaning Brush】The 58mm espresso cleaning brush is made of durable nylon bristles brush and Ergonomic Handle Plastic, it is the best cleaner tool to clean your semi-automatic espresso coffee machine's 58mm group head, gaskets, and shower screen.
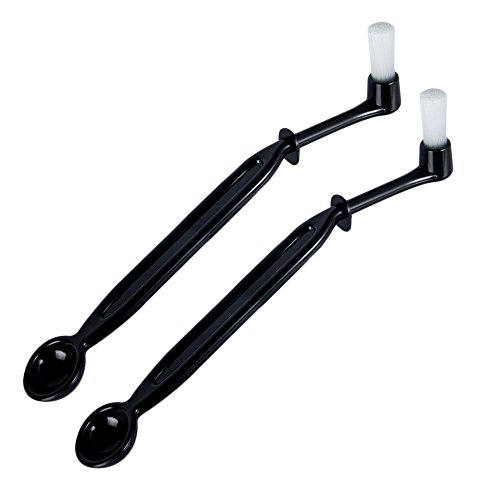
Perfect cleaner and clean your group head on your espresso machine

【ESPRESSO BRUSH】- 2pcs espresso machine cleaning brush with spoon and 2pcs detachable brush head.
Prepare a 1:2 White‑Vinegar‑to‑Water Descaling Solution
Since you’re wondering exactly how to mix the right descaling solution, let’s clear it up right away.
What vinegar concentration should I use?
You need a mild vinegar concentration that still attacks limescale. The standard 1:2 scaling ratios—one part distilled white vinegar to two parts water—give you about a 33 % acetic mix, which is strong enough to dissolve mineral buildup but gentle enough to avoid harsh odors.
How do I measure the right amount?
Grab a measuring cup. For a 12‑oz reservoir, combine 4 oz vinegar with 8 oz water; for a quart, use 1 cup vinegar and 2 cups water; for two quarts, double that. Scale the recipe to match your machine’s capacity, never exceeding the max fill line.
What’s the next step after mixing?
Stir the solution, then pour it into the reservoir before you start the descaling cycle. The mixture will sit, dissolve scale, and protect internal parts.
Takeaway: Use a 1:2 ratio, measure accurately, and fill only to the recommended line. Next, you’ll run the descaling cycle and let it soak.
Citric acid is another effective descaling agent that works by chelating calcium and magnesium ions, breaking down hard‑water deposits without the strong odor of vinegar.
Hard water can cause mineral buildup that clogs the machine and reduces heating efficiency.
Regular descaling helps maintain optimal brew quality and prevents mineral buildup that can damage the machine over time.

One 16-fluid-ounce bottle of Distilled White Vinegar

VERSATILE PANTRY STAPLE: Perfect for cooking, pickling, marinating, and enhancing your favorite recipes with a crisp, tangy flavor.

VERSATILE PANTRY STAPLE: Perfect for cooking, pickling, marinating, and enhancing your favorite recipes with a crisp, tangy flavor.
Run the Descaling Cycle and Let It Soak (15‑30 min)
How do I actually start the descaling cycle and let it soak?
You press and hold the clean button about five seconds until the clean light flashes, activating descaling mode. The machine then begins its automatic cycle, pumping vinegar solution for roughly 12 minutes. When the light turns off, you’ve completed the cycle timing. The clean light stays on until the procedure is finished clean light.
What should I do during the soak?
Leave the solution in the reservoir and let it sit for the recommended soak duration of 15‑30 minutes. This pause lets the acid break down mineral buildup inside the water lines, heating element, and brew pathways—much like letting a stain soak before washing. Regular descaling helps maintain coffee quality and prolongs machine longevity machine health.
Why does the soak matter?
Longer contact loosens scale that a quick flush might miss, especially if your machine sees heavy mineral deposits. After the soak, you’ll be ready for the next step: rinsing with fresh water. Regular descaling can extend the machine’s service life to seven to ten years.
Maintaining a clean drip tray and water tank also prevents mold growth and ensures consistent pressure during brewing drip tray.

2-Pack Coffee Descaler and Cleaner - Clean and rinse away residue and oil buildup in your coffee maker with Impresa's Coffee Descaler Solution. Our highly effective solution comes with two 8-ounce bottles - enough for 4 descaling sessions (2 uses per bottle)

Bulk Coffeemaker Decalcifier Tablet: 24 Tablets Work out to a Year Supply or more. Compare to other products like powder, pods, sachet, packets. Choose ACTIVE Cleaning Tablets for better Values

RESTORE COFFEE FLAVOR & AROMA: Our universal descaling solution removes bitter mineral buildup and calcium deposits from heating elements. This ensures your Keurig cleaner process restores the original "day one" taste of your favorite pods and espresso capsules
Rinse the System With Multiple Fresh‑Water Cycles
If you’re wondering why you need more than one water‑only brew after the vinegar soak, it’s because a single flush can’t carry all the lingering acid out of the hidden tubes.
How many rinses are enough?
You’ll run at least two full water‑only cycles, but most experts recommend three or four. Each brew should run completely, then you empty the reservoir between rinses. Draining the carafe and reservoir prevents any vinegar concentration from slipping into the next cycle, so the water stays truly fresh.
What else to rinse?
After each cycle, discard the spent water, then rinse the carafe, filter basket, and drip tray with tap water. This extra step clears any residual taste that might cling to removable parts.
Takeaway
Multiple water‑only cycles with an empty reservoir between rinses fully purge vinegar, leaving neutral‑tasting water and a fresh‑smelling machine. Next, you’ll reassemble the machine and brew a test cup.
Regular descaling removes mineral buildup that can otherwise clog the internal passages and degrade brewing temperature.
regular descaling helps maintain optimal pressure and extends the machine’s lifespan.
A thorough rinse also protects the pump seal from premature wear.

Steam Brewing: Powerful steam-brewing process brews dark, rich espresso, great for making Cuban coffee

3-Layer Filtration 51mm (2.01in) compatible with Casabrews,CM5418, 3700 5418Pro , Mr. Coffee BVMC-ECMP1000、ECM160、ECM200 espresso machines. Direct replacement basket without extra modification.

4 pack Silicone Tube
Reassemble the Machine and Brew a Test Cup
You’re probably wondering how to put everything back together without missing a single tube or screw. First, dry every component, then match tubing, valves, seals and gaskets to their original spots using your photos. Refit panels and fasteners, tightening screws just enough to hold—no stripping.
All right, secure the housing and verify clips, tabs and specialty screws sit correctly. Check for gaps; any misalignment hints at an incomplete assembly.
Now, restore the water path: reconnect tubes, seat O‑rings, attach clips, and lock the reservoir cap. Fill the tank, place a cup under the brew outlet, and run a plain brew cycle.
Watch for steady flow, listen for odd noises, and perform leakage detection by inspecting seams and drip trays. Conduct a quick pressure test—if water erupts or drips, re‑tighten connections.
If the brew head delivers a smooth, steady stream, you’ve passed the pressure test and the machine is ready for coffee. Takeaway: double‑check every connection, run a leak‑free test, and you’ll avoid future headaches. Micro‑switch wiring keeps the heating element continuously powered. regular cleaning helps prevent oil buildup inside the grinder chamber.
Set a Monthly Maintenance Schedule for Your Mr. Coffee Espresso Machine
Ever wonder why your espresso sometimes tastes off or the brew slows down? You’re probably missing a regular care routine.
How often should I clean each part?
Run a deep‑clean cycle once a month with a half‑vinegar, half‑water mix, then rinse three times with plain water. Empty and rinse the reservoir, wash the carafe, lid, and filter basket with warm,apy. Replace the filter according to the filter replacement schedule; most models need a new filter every 2‑3 months.
What about the espresso‑specific components?
Flush the milk frothing path after each use, and soak the wand and milk reservoir monthly. Inspect the two safety valve and perform a valve inspection for leaks.
What’s the quick reference?
Follow the monthly cleaning checklist: descaling, filter change, valve inspection, and all removable parts.
Takeaway: Stick to this schedule and your machine stays fast, flavorful, and safe. Ready to set a calendar reminder? Deep‑clean alert after 90 brew cycles.

Includes: 2 portioned pouches of descaling solution specially designed for your Nespresso machine

8 Uses Value-Size Bottle: Same as 4 x 8oz bottle kit of other products! Less Waste, Better Value!

MULTI-USE - This product can be used to descale coffee and espresso machines, as well as kettles